Leverage browser caching & Preload key requests
Leverage browser caching
What is browser caching?
Every time a browser loads a webpage it has to download all the web files to properly display the page. This includes all the HTML, CSS, JavaScript and images. The issue is two fold.
- These large files take longer to load and can be especially painful if you’re on a slow internet connection (or a mobile device).
- Each file makes a separate request to the server. The more requests your server gets simultaneously the more work it needs to do, only further reducing your page speed.
How does it work?
Web server telling the browser to store these files and not download them when you come back saves your users time and your web server bandwidth.
The main reason why browser caching is important is because it reduces the load on your web server, which ultimately reduces the load time for your users.
How to enable browser caching?
To enable browser caching you need to edit your HTTP headers to set expiry times for certain types of files.
General guidelines for setting expiries:
- Truly static content (global CSS styles, logos, etc.) – access plus 1 year
- Everything else – access plus 1 week
.NET Core:
In startup.cs file, under Configure() method we need to add below code.
Example:
public void Configure(IApplicationBuilder app, IWebHostEnvironment env){
	app.UseStaticFiles(new StaticFileOptions{
		OnPrepareResponse = ctx =>{
			ctx.Context.Response.Headers.Append("Expires", DateTime.UtcNow.AddDays(7).ToString("R",      CultureInfo.InvariantCulture));
		}
	}
}
Serve static assets with an efficient cache policy
Overview:
This rule triggers when the response from your server does not include caching headers or if the resources are specified to be cached for only a short time.
Fetching resources over the network is both slow and expensive: the download may require multiple round trips between the client and server, which delays processing and may block rendering of page content, and also incurs data costs for the visitor.
Recommendations:
Each resource should specify an explicit caching policy that answers the following questions: whether the resource can be cached and by whom, for how long, and if applicable, how it can be efficiently revalidated when the caching policy expires. When the server returns a response it must provide the Cache-Control and ETag headers:
- Cache-Control defines how, and for how long the individual response can be cached by the browser and other intermediate caches.
- ETag provides a revalidation token that is automatically sent by the browser to check if the resource has changed since the last time it was requested.
Example:
public void Configure(IApplicationBuilder app, IWebHostEnvironment env){
app.UseStaticFiles(new StaticFileOptions{
OnPrepareResponse = ctx =>{
string path = ctx.File.PhysicalPath;
if (path.EndsWith(".css") || path.EndsWith(".js")) {
TimeSpan maxAge = new TimeSpan(150, 0, 0, 0); //150 days
ctx.Context.Response.Headers.Append("Cache-Control", "max-age=" + maxAge.TotalSeconds. ToString("0"));
}
else if (path.EndsWith(".gif") || path.EndsWith(".jpg") || path.EndsWith(".png")) {
TimeSpan maxAge = new TimeSpan(150, 0, 0, 0); //150 days
ctx.Context.Response.Headers.Append("Cache-Control", "max-age=" + maxAge.TotalSeconds.
ToString("0"));
} else {
ctx.Context.Response.Headers.Append("Cache-Control", "no-cache");
}
}
}
}
Make favicon small and cacheable
Keep favicons small and configure their caching.
A favicon is an icon associated with a web page; this icon resides in the favicon.ico file in the server’s root. Since the browser requests this file, it needs to be present; if it is missing, the browser returns a 404 error.
Since favicon.ico resides in the server’s root, each time the browser requests this file, the cookies for the server’s root are sent. Making the favicon small and reducing the cookie size for the server’s root cookies improves performance for retrieving the favicon.
Making favicon.ico cacheable avoids frequent requests for it.
Preload key requests
Preload is a new web standard aimed at improving performance and providing more loading control to web developers. It gives developers the ability to define custom loading logic.
Declare preload links in your HTML to instruct the browser to download key resources as soon as possible.
<head>
  ...
  <link rel="preload" href="styles.css" as="style">
  <link rel="preload" href="ui.js" as="script">
  ...
</head>
Make AJAX cacheable
By allowing AJAX requests to be cacheable, it can prevent unnecessary delays.
One of AJAX’s benefits is it provides instantaneous feedback to the user because it requests information asynchronously from the backend web server. However, using AJAX does not guarantee the user will not wait for the asynchronous JavaScript and XML responses to return.
Optimizing AJAX responses is important to improve performance, and making the responses cacheable is the best way to optimize them.
This doesn’t apply if you use the POST method in your Ajax requests, because POST requests are never cached.
Example
$.ajax({
...
cache: true,
headers: {
     'Cache-Control':'max-age=604800, public'
}
...
});
https://stackoverflow.com/questions/33390424/how-to-control-cache-control-in-ajax-request
Use GET for AJAX requests
AJAX requests are in both GET and POST modes.
The main difference that improves website speed in using POST and gets methods in AJAX is by sending.
If the request is POST, it will first be sent as an HTTP request in the header, and then the server responds to this request. In the GET method, both of these steps will be performed together.
This will make your website faster to process requests simultaneously in one step.
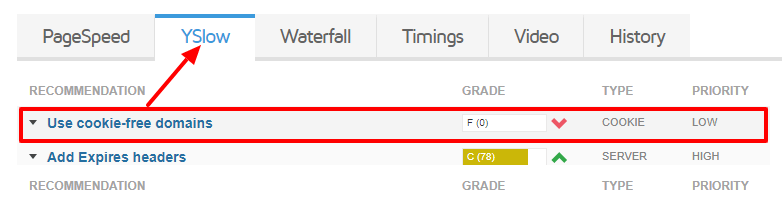
Use cookie-free domains
What is a cookie?
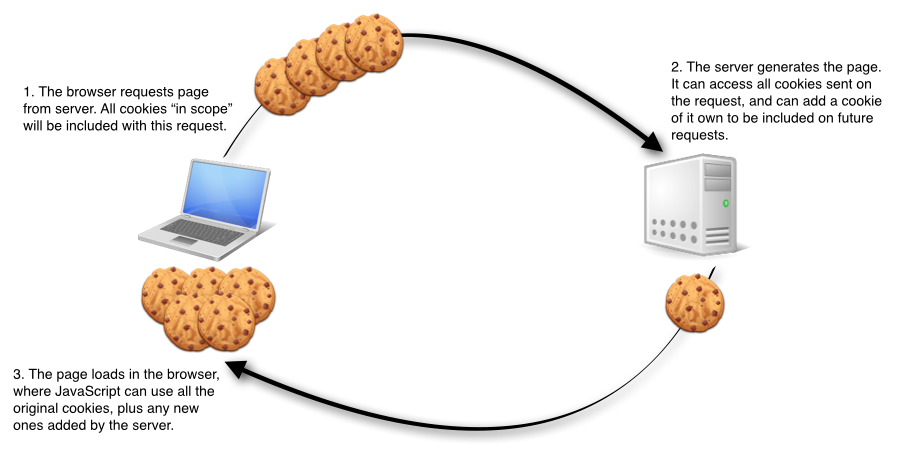
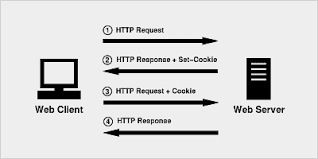
Cookies are small pieces of information sent from a web server and stored on your computer. They are used to contain identity and browser state information. They were introduced as a mechanism to get round the fact that HTTP is a stateless protocol. Typically cookies are used for a variety of purposes:
- To identify you and for authentication purposes
- To remember things e.g. what products were placed in your basket?
- Recording past activity e.g. which pages did you visit?
- Record information about you e.g. your preferences
Cookies impact performance because every time you make a request to a web server for an object (e.g. an HTML file, a CSS file, an image) the browser will send the cookie in the request to the server. This means that as your cookie size grows, each request becomes a little bigger and thus performance begins to degrade.
Reduce Cookie Size
HTTP cookies are used for authentication, personalization, and other purposes. Cookie information is exchanged in the HTTP headers between web servers and the browser, so keeping the cookie size small minimizes the impact on response time. – YSlow
Keeping your cookie sizes small might not be as important as it used to be but it is something you should always check, especially if you are a developer. Some additional tips are:
- Eliminate unnecessary cookies
- Keep cookie sizes as low as possible to minimize the impact on the user response time.
- Be mindful of setting cookies at the appropriate domain level so other subdomains are not affected
- Set an Expires date appropriately.Impact of cookies on response time
Impact of cookies on response time
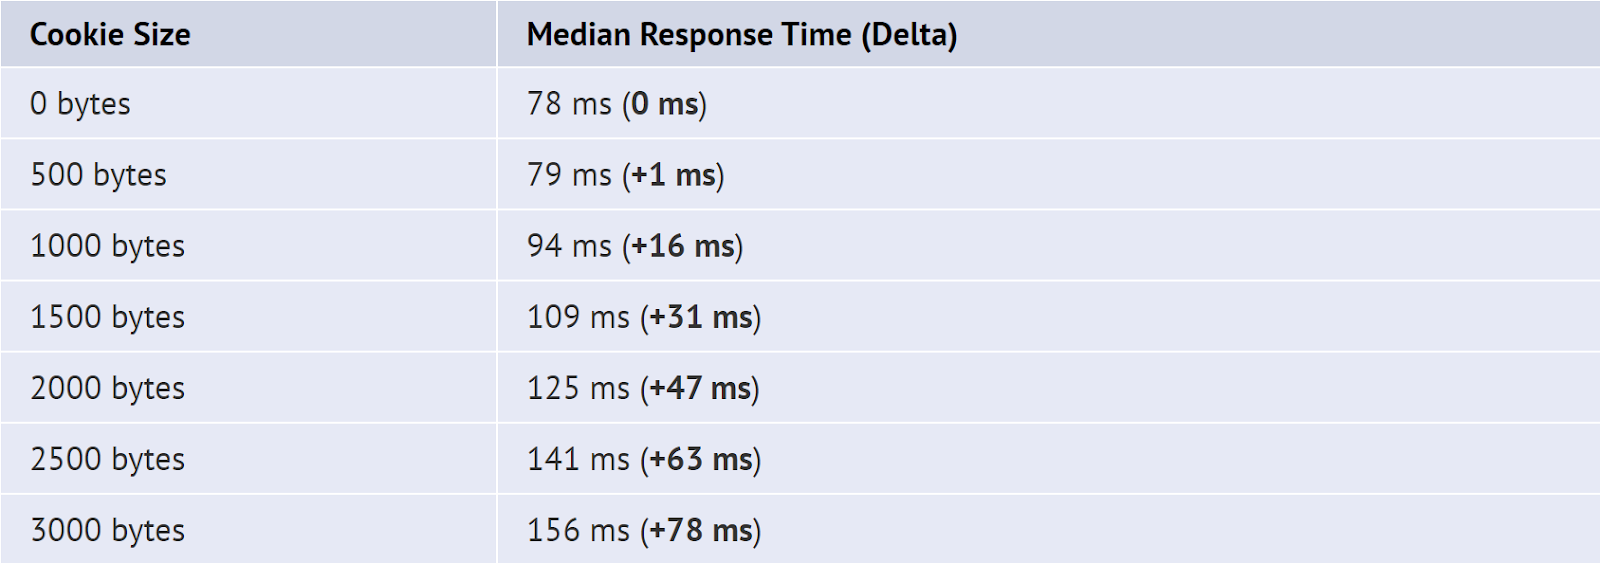
Note: Times are for page loads on DSL (~800 kbps).
These results highlight the importance of keeping the size of cookies as low as possible to minimize the impact on the user’s response time. A 3000 byte cookie, or multiple cookies that total 3000 bytes, could add as much as an 80 ms delay for users on DSL bandwidth speeds. The delay is even worse for users on dial-up.
What is a cookie-free domain?
A cookie-free domain is a very simple concept. It’s actually a domain which does not send a command to the visitor’s browser to store cookies from the website. Our website has some static content such as image, javascript and CSS files. These contents don’t change so often.
That’s why they don’t need to be accompanied by cookies, as there is no user interaction with these resources. So by configuring a domain that doesn’t set cookies, we can decrease the size of the total request made by the visitor’s browser to our server, while trying to download page resources.
The concept behind this strategy is to reduce server latency by reducing the number of requests which can impact a little on your website performance.
How to setup or use cookie-free domains
If you set your cookies on a top-level domain (e.g. yourwebsite.com) all of your subdomains (e.g. static.yourwebsite.com) will also include the cookies that are set.
Therefore, in this case, it is required that you use a separate domain name to deliver your static content if you want to use cookie-free domains. However, if you set your cookies on a www subdomain such as www.yourwebsite.com, you can create another subdomain (e.g. static.yourwebsite.com) to host all of your static files which will no longer result in any cookies being sent.
Warning: If you are using a root domain without a “www” version like zealousweb.com then using the subdomain as the cookieless domain does not work.
There are a couple of ways to configure a cookie-free domain. using a separate domain name, set up a CDN and reconfiguring WordPress site.
Reference: https://wpblogging.in/site-optimization/4-ways-to-setup-cookie-free-domains/
How To Use Cookie-Free Domains for WordPress
- Create a subdomain such as static.yourwebsite.com
- Point your new subdomain to the /wp-content directory of your WordPress installation.

- Edit your wp-config.php file to reflect the following:
define(“WP_CONTENT_URL”, “http://static.yourwebsite.com”);
define(“COOKIE_DOMAIN”, “www.yourwebsite.com”); - Run the following command in your SQL database, this will ensure all post URLs are directed to the new subdomain:
UPDATE wp_posts SET post_content = REPLACE(post_content,’www.yourwebsite.com/wp-content/’,’static.yourwebsite.com/’)
Also, re-configure your WordPress site and Use Cookie-Free Domains – WordPress Plugin (WP2Static : https://wordpress.org/plugins/static-html-output-plugin/)
Reference : https://authoritywebsiteincome.com/setup-a-cookieless-domain/#4_Direct_url_to_new_subdomain
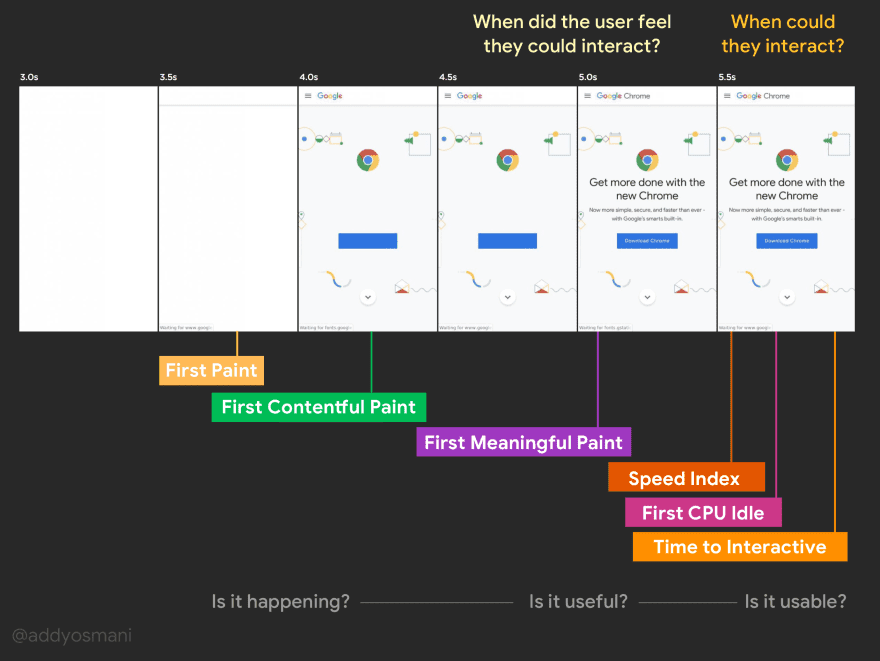
Time To Interactive
The TTI (Time To Interactive) metric measures the time a page takes before the user can interact with it – how long before it responds to a click. It depends on when:
- The page displays useful content, which is measured by the First Contentful Paint,
- Event handlers are registered for most visible page elements, and
- The page responds to user interactions within 50 milliseconds.
TTI score table:
| TTI metric (in seconds) | Color-coding | TTI score
(HTTP Archive percentile) |
| 0–5.2 | Green (fast) | 75–100 |
| 5.3–7.3 | Orange (moderate) | 50–74 |
| Over 7.3 | Red (slow) | 0–49 |
How to improve?
- Time To Interactive is directly influenced by JavaScript scripts, which can block page rendering.
- More scripts = Delay to TTI
- It can be vary across the devices (Processor speed)
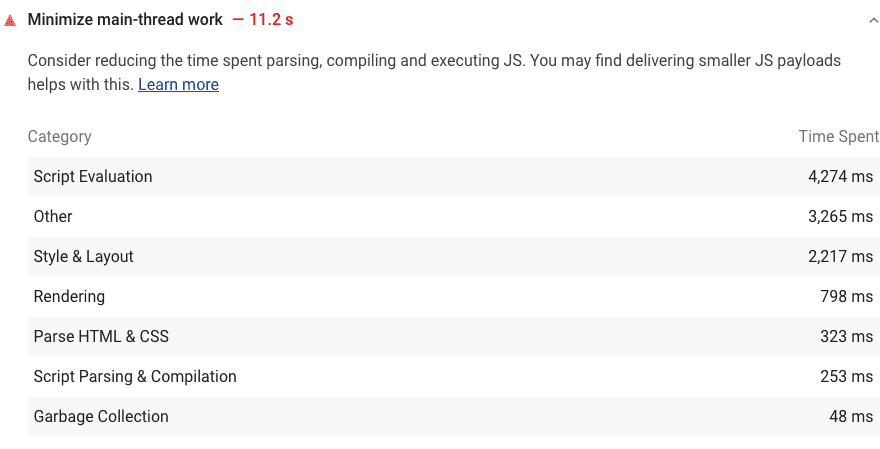
Minimize main-thread work
The browser’s renderer process is what turns your code into a web page that your users can interact with.
The main thread of the renderer process typically handles most code:
- Parse HTML -> builds the DOM,
- Parse CSS -> applies the specified styles
- Parse JavaScript -> evaluates, and executes the JavaScript.
The main thread also processes user events. So, any time the main thread is busy doing something else, your web page may not respond to user interactions, leading to a bad experience.
How the Lighthouse main thread work audit fails
How to reduce load on the main thread?
Consider these tactics to improve JavaScript performance during page load:
- Only send the code that your users need by implementing code splitting.
- Minify and compress your code.
- Remove unused code.
- Reduce network trips by caching your code with the PRPL pattern.
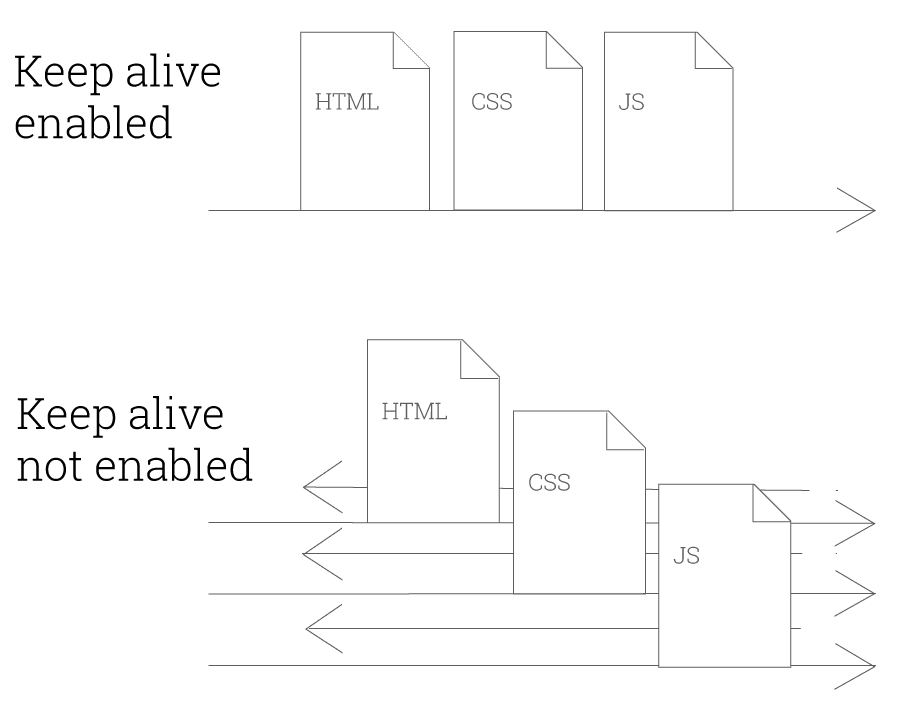
Enable Keep-Alive
What is keep-alive?
- Keep alive is a method to allow the same tcp connection for HTTP conversation instead of opening a new one with each new request.
- More simply put, it is a communication between the web server and the web browser that says “you can grab more than just one file at a time”.
- Keep alive is also known as a persistent connection.
Example:
How to enable keep-alive?
- Keep-alive is enabled using the “Connection: Keep-Alive” HTTP header
- Enabling keep-alive depends on what server you are using and what you have access to. We cover the most common methods below:
- Enable keep-alive using .htaccess i.e. Header set Connection keep-alive
- Enable keep-alive using server side (Apache, NGINX, etc)
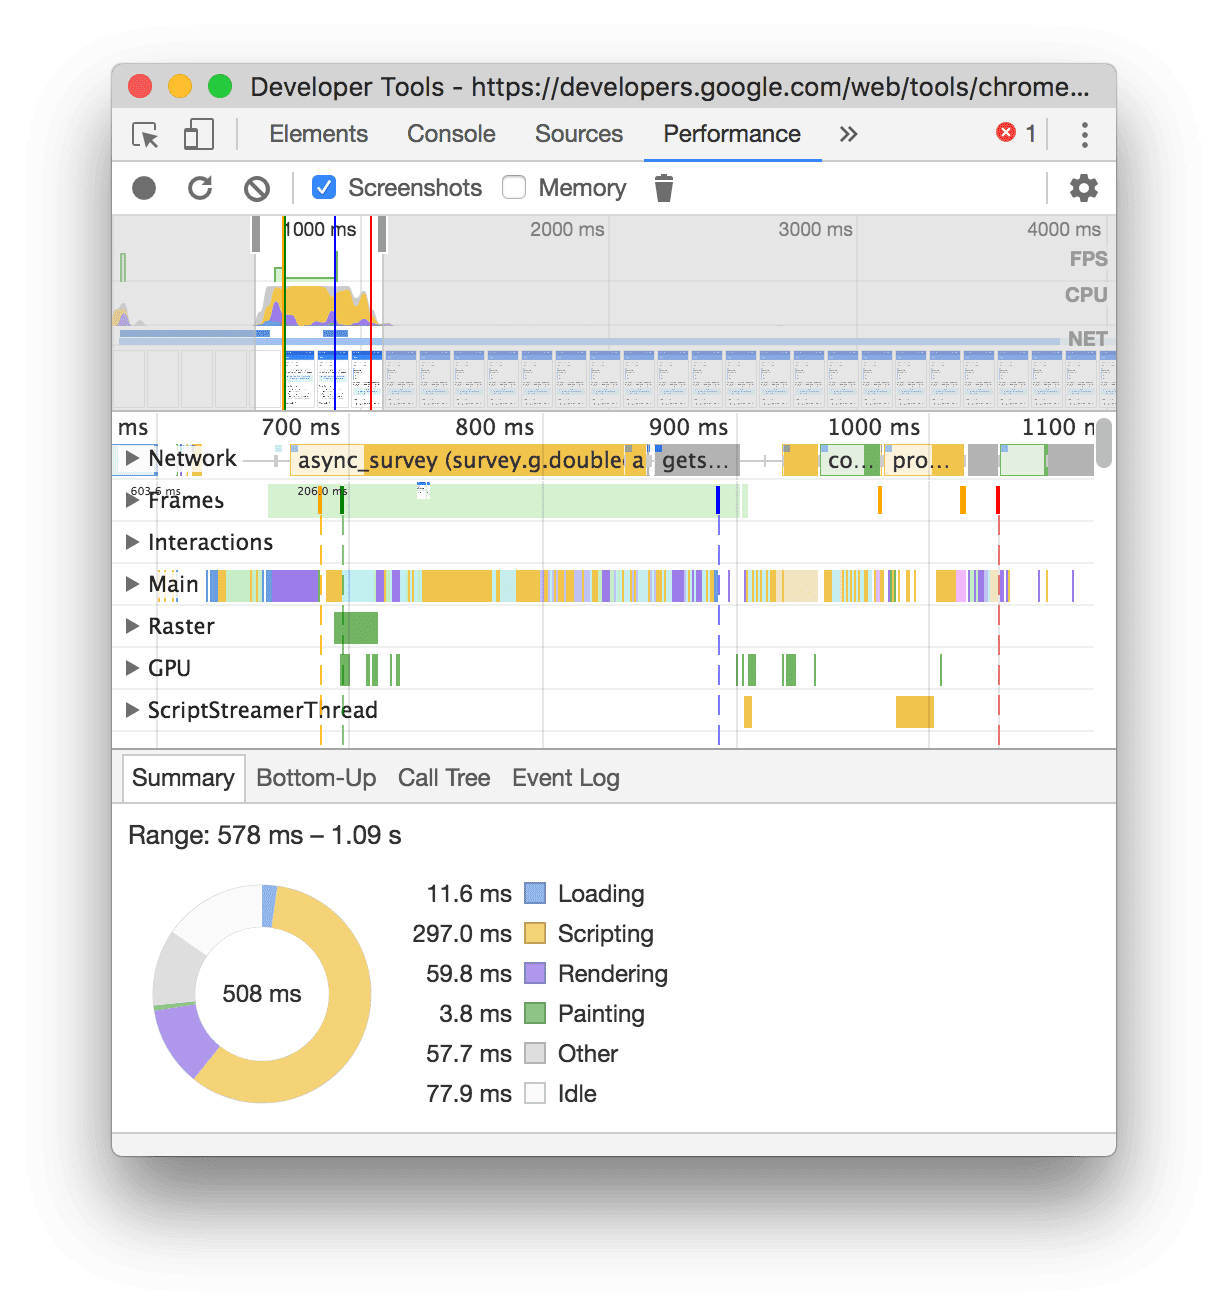
User Timing marks and measures
- The User Timing API enables you to measure your app’s JavaScript performance. The basic idea is that you decide which parts of your scripts you want to optimize, and then you instrument those parts of your scripts with the User Timing API.
- From there, you can access the results from JavaScript using the API, or view them on your Chrome DevTools Timeline Recordings.
Performance Analysis Reference – Record load performance
Speed Index
Introducing the Speed Index
The speed index is term refers to the length of time required before the visible components of any web page are displayed on your screen.
Also we can say, The speed index takes the visual progress of the visible page loading and computes an overall score for how quickly the content painted.
Another way that speed index can be important is when you actually get around to trying to improve your site’s performance.
What is a speed index?
- Speed index is how many milliseconds it takes for the visible parts of a webpage to be displayed.
- It is expressed in milliseconds and dependent on size of the view port.
- The speed index metric was created and added to WebPageTest back in 2012.
- It is expressed as a numeric score with a lower score being considered ideal.
When you test your site in WebPageTest then you can find it like as below :

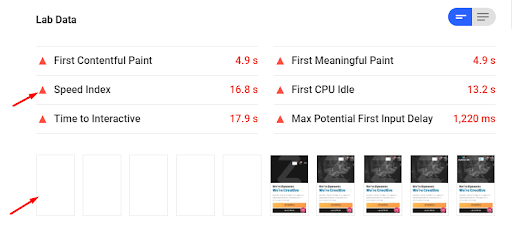
In Google Page Speed – You can find Speed Index here :
Why do we need speed index?
- Speed Index has become a very important metric over the last decade or so, because it is a good measure of a website’s performance. It measures how quickly the contents of a page are visually populated.
- When a website doesn’t load the content as quickly as it should, it probably won’t have as many visitors as it should have. Therefore, speed index has proven to be very useful in measuring website performance against the performance of competitors.
- Another way that speed index can be important is when you actually get around to trying to improve your site’s performance.
How is speed index calculated?
- When you run a website through WebPageTest, the tool takes snapshots of the screen as your content loads.
- Each captured frame is scored for visual completeness above the fold, and each score is calculated using the following formula:
Interval time * (1 – visual completeness/100)
- Time is represented in intervals of 500 millisecond.
- Visual completeness is the percentage of total above-the-fold content that has been loaded
- Each frame is scored until all content is visible, and then all of the scores are added up to give you a speed index.
Take a look at the following example:
- Take a look at the following example:
- This theoretical website takes 3,500 milliseconds to load all of its content.
- If you apply the formula to each of the six intervals, you get 500, 450, 350, 300, 200, 100, and 0 respectively. Add it all up, and you get a speed index of 1900. Below are the calculations for each 500ms time internal:
500 * (1-0/100) = 500
500 * (1-10/100) = 450
500 * (1-30/100) = 350
500 * (1-40/100) = 300
500 * (1-60/100) = 200
500 * (1-80/100) = 100
500 * (1-100/100) = 0
How to improve your speed index.
There is different points of optimisation will need to take care for improve Speed Index. That as below:
- Use lazy loading images
- Add placeholders
- Eliminate unnecessary downloads.
- Compress your data – Gzip
- Create a caching hierarchy – Cache Plugin
- Optimise your images
Here is the all link which I have refer to collect all content :
- https://blog.dareboost.com/en/2018/02/speed-index-web-performance/
- https://sites.google.com/a/webpagetest.org/docs/using-webpagetest/metrics/speed-index
- https://www.keycdn.com/blog/speed-index
- https://www.keycdn.com/support/optimus/progressive-jpeg
- https://www.fasterize.com/en/blog/speed-index-a-key-metric-for-the-user-experience/
- https://sites.google.com/a/webpagetest.org/docs/using-webpagetest/metrics/speed-index
What is compression?
When a user hits your website a call is made to your server to deliver the requested files. the bigger these files are the longer it’s going to take for them to get to your browser and appear on the screen.
Compression should be near the top of your page speed optimizations if you don’t have it setup already.
Gzip/Brotli compresses your webpages and style sheets before sending them over to the browser.
How to enable Gzip compression
- Compression is enabled via webserver configuration
- Different web servers have different instructions (explained below)
The code below should be added to your .htaccess file… ( After added code check to see if your compression is working using the Gzip compression tool.)
<ifModule mod_gzip.c>
mod_gzip_on Yes
mod_gzip_dechunk Yes
mod_gzip_item_include file .(html?|txt|css|js|php|pl)$
mod_gzip_item_include handler ^cgi-script$
mod_gzip_item_include mime ^text/.*
mod_gzip_item_include mime ^application/x-javascript.*
mod_gzip_item_exclude mime ^image/.*
mod_gzip_item_exclude rspheader ^Content-Encoding:.*gzip.*
</ifModule>
For more: https://varvy.com/pagespeed/enable-compression.html
If they are not working there is another way that may work for you. If the above code did not seem to work, remove it from your .htaccess file and try this one instead…
AddOutputFilterByType DEFLATE text/plain
AddOutputFilterByType DEFLATE text/html
AddOutputFilterByType DEFLATE text/xml
AddOutputFilterByType DEFLATE text/css
AddOutputFilterByType DEFLATE application/xml
AddOutputFilterByType DEFLATE application/xhtml+xml
AddOutputFilterByType DEFLATE application/rss+xml
AddOutputFilterByType DEFLATE application/javascript
AddOutputFilterByType DEFLATE application/x-javascript
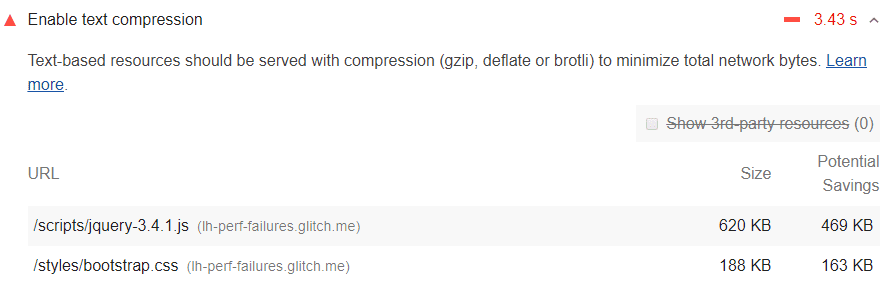
Enable text compression
Text-based resources should be served with compression to minimize total network bytes. The Opportunities section of your Lighthouse report lists all text-based resources that aren’t compressed:
How Lighthouse handles text compression
Lighthouse gathers all responses that:
- Have text-based resource types.
- Do not include a content-encoding header set to br, gzip, or deflate.
Lighthouse then compresses each of these with GZIP to compute the potential savings.
If the original size of a response is less than 1.4KB, or if the potential compression savings is less than 10% of the original size, then Lighthouse does not flag that response in the results.
How to enable text compression on your server
- Configure your server to compress the response with Brotli, if the browser supports it. (Brotli is a newer compression format, but it’s not universally supported in browsers.)
- Use GZIP as a fallback to Brotli. GZIP is universally supported in all modern browsers, but is less efficient than Brotli.
What the heck is Brotli?
Just like gzip, Brotli is a new compression algorithm engineered by Google. Google introduced Brotli in 2015 and added it to its Chrome browser March 2016. Brotli is also supported by Firefox, Opera and in the Android browser.
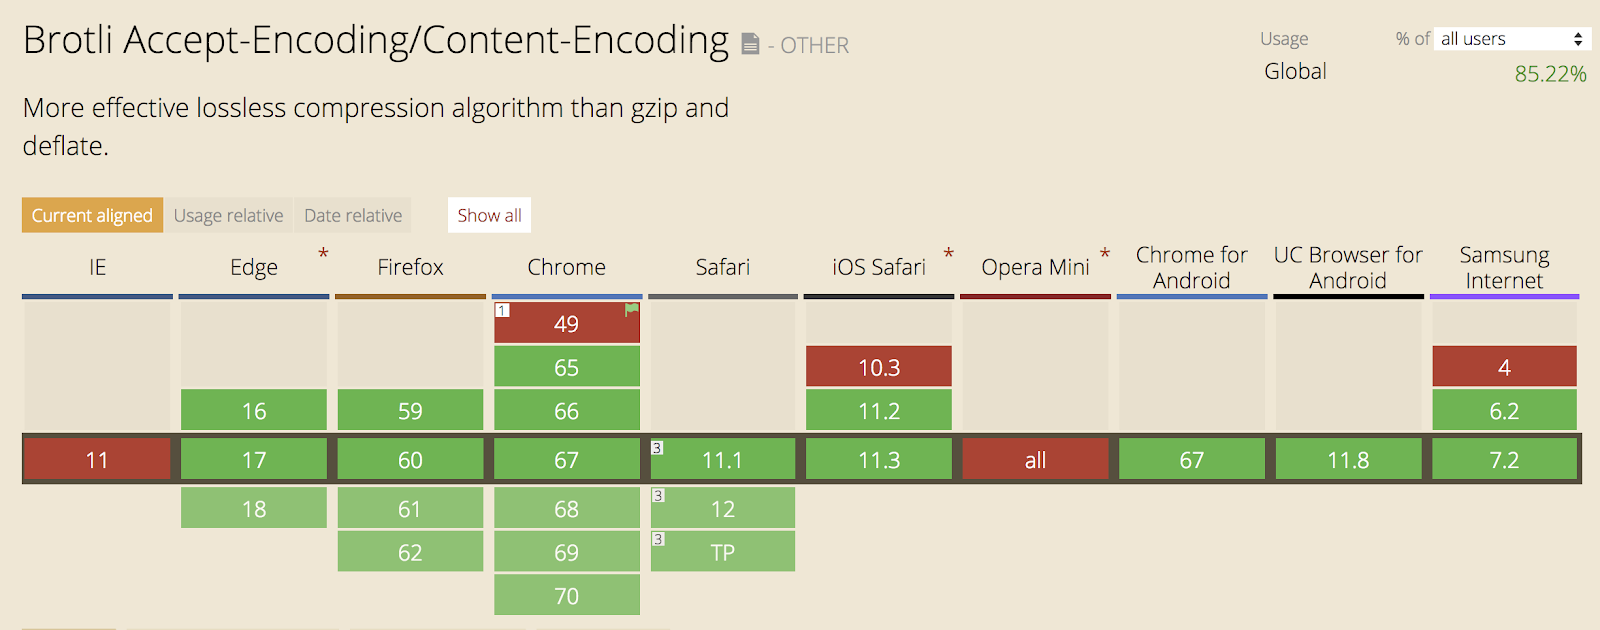
Does your browser support Brotli?
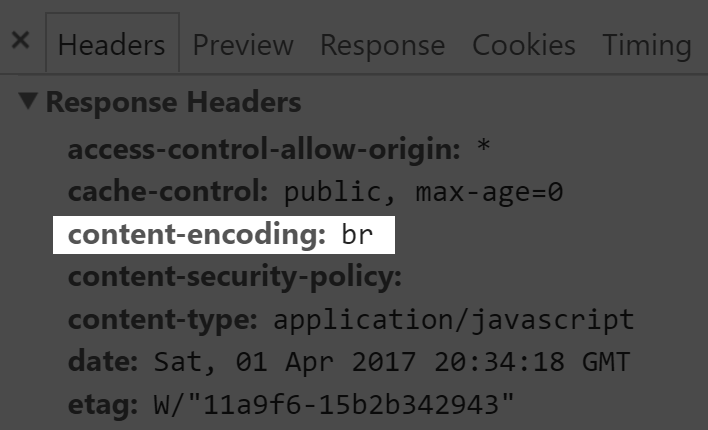
Browsers which support Brotli send ‘br’ along with ‘gzip’ in accept-encoding request header. If Brotli is enabled on your web server, you will get response in Brotli compressed format.
Gzip vs Brotli:
The advantage for Brotli over gzip is that it makes use of a dictionary and thus it only needs to send keys instead of full keywords. According to certsimple,
- Javascript files compressed with Brotli are 14% smaller than gzip.
- HTML files are 21% smaller than gzip.
- CSS files are 17% smaller than gzip.
Embracing the Brotli side:
There were two ways by which we can deliver Brotli compressed assets:
- Enabling Brotli on our web-server
- Enabling Brotli on CDNs (By this way you don’t have to write any code or install anything in your infra, but this will be a paid service.)
To enable brotli compression for your site add config to .htaccess (For apache) :
<IfModule mod_brotli.c>
AddOutputFilterByType BROTLI_COMPRESS text/html text/plain text/xml text/css text/javascript application/x-javascript application/javascript application/json application/x-font-ttf application/vnd.ms-fontobject image/x-icon
</IfModule>
Avoid URL Redirects
Redirects slow down your page load speed. When a browser requests a resource that has been redirected, the server usually returns an HTTP response like this:

A landing page redirect can be defined as having more than one redirect from a URL to a final landing page. An example would be a redirect from abc.com >> https://abc.com >> https://www.abc.com.
URL redirects are made using HTTP status codes 301 and 302. They tell the browser to go to another location.
According to Google, a landing page must have less than 10 redirects. If there are more than 10, then Google renders your landing page as uncrawlable.
How the Lighthouse multiple redirects audit fails
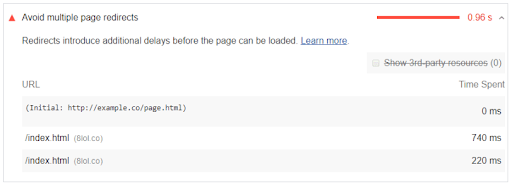
A page fails this audit when it has two or more redirects.
How to eliminate redirects
- Optimizing the critical rendering path refers to prioritizing the display of content that relates to the current user action.
- If you’re using redirects to divert mobile users to the mobile version of your page, consider redesigning your site to use Responsive Design.
- Your non-HTML resources – images, embedded videos, and CSS should be directly accessed
- Properly implement the trailing slash:
If you enter http://abc.com/ for example and get redirected to https://www.abc.com,
there are two redirects http://abc.com/ >> (http://www.abc.com/ >> https://www.abc.com)
Free Course By Google
https://www.udacity.com/course/website-performance-optimization–ud884

Avoid Bad Requests
Removing “broken links”, or requests that result in 404/410 errors, avoids wasteful requests.
As your website changes over time, it’s inevitable that resources will be moved and deleted. If you don’t update your frontend code accordingly, the server will issue 404 “Not found” or 410 “Gone” responses.
In the short term, you should scan your site for such links with a link checking tool, such as the crawl errors tool in Google’s Webmaster Tools, and fix them.
Avoid HTTP 404 (Not Found) error
Making an HTTP request and receiving a 404 (Not Found) error is expensive and degrades the user experience.
Particularly bad is when the link to an external JavaScript is wrong and the result is a 404. First, this download will block parallel downloads. Next the browser may try to parse the 404 response body as if it were JavaScript code, trying to find something usable in it.
Conclusion
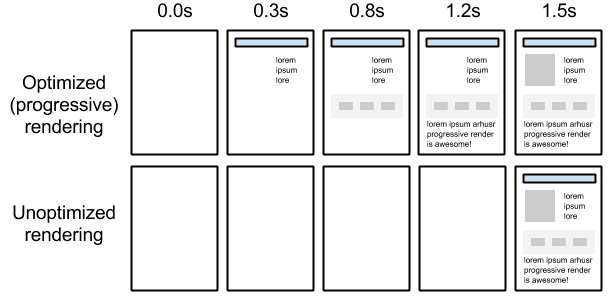
- Use Optimized Progressive Rendering – FREE COURSE By Google
- Redirect is Better than 404 page but try to minimize the use of redirection.
- Remove unwanted resources like ( fonts / images / files ) which are not used in the site.
- Before release website/Update always check 404 error is there or not.
- For checking please use Google’s Webmaster .
- Also find in the GTmetrix waterfall tab ( 404 status ).
- In WordPress you can use plugin ( Broken Link Checker ).
First Input Delay
- First Input Delay (FID) measures the time from when a user first interacts with your site to the time when the browser is actually able to respond to that interaction.
- FID measures actions like clicks, key presses and entering text in fields. It does not include scrolling or zooming since they can be run on a separate thread by the browser.
- First Input Delay (FID) is totally depend upon First Contentful Paint (FMP) and First Meaningful Paint (FMP).
- A common cause of long FIDs is large JavaScript bundles with long-running initialisation tasks.
- One approach to improve First Input Delay is by deferring non-critical tasks until they’re called for. Use “Idle Until Urgent”
- Third party ads and social widgets have a reputation for being greedy when it comes to consuming resources on their host pages so you should aim to include the fewest third-party iframes possible.
Track First Input Delay
FID can be measured using Google’s tracking library. This library exposes the perfMetrics object, which tracks FID with the onFirstInputDelay() method.
perfMetrics.onFirstInputDelay(function(delay, evt) {
// Do something with the delay, for example send to analytics
});
With the delay response, you can track it by sending it to tools like Google Analytics or whatever else you use.
Keep request counts low and transfer sizes small
What are HTTP Requests?
HTTP requests happen when a web browser sends a “request” to your website’s server for information on a webpage. When a user visits a page on your website, your server sends this request and returns the files contained on that page to the user’s browser. The fewer HTTP requests a website has to make, the faster the site can load.
Why HTTP Requests Affect the User Experience
There are two reasons HTTP requests can affect your website’s user experience: the number of files being requested and the size of the files being transferred.
More Files = More HTTP Requests
A web browser needs to make a separate HTTP request for every single file on your website. If your website doesn’t have many files, it won’t take very long to request and download the content on your site. But most good websites do have a lot of files.
The more files on your website, the more HTTP requests your user’s browser will need to make. The more HTTP requests a browser makes, the longer your site takes to load.
Bigger Files = Longer HTTP Requests
The size of the file being transferred is also a factor in how long a page may take to load on a user’s screen. Big, high-definition images are a common culprit of large file sizes.
In other words, the larger or higher definition the content is on your website, the larger its file size is. The larger the file size, the longer it will take to transfer it from your server to a user’s browser.
The longer this file is it transit, the longer a user’s browser has to wait before it renders this content on his/her screen.
Other CSS/JS/Image optimizations
- Inline CSS/JS
- Avoid the import css method (@import)
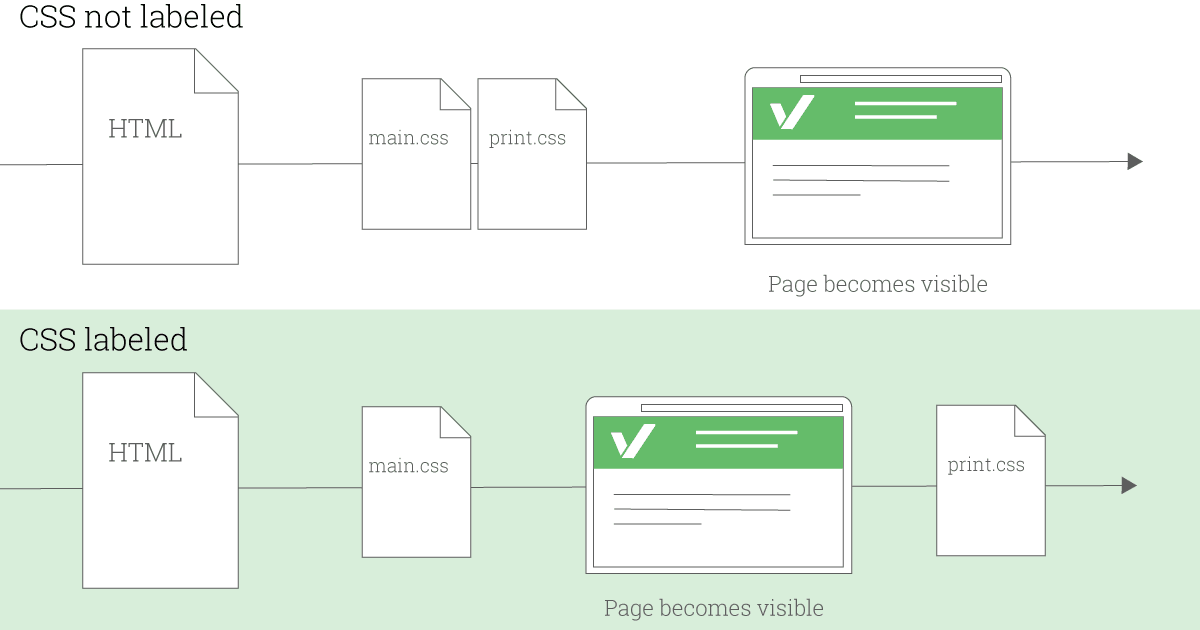
- Properly label conditional css
- No CSS in HTML things like your divs or your h1s (in element CSS)
- Combine CSS/JS files together.
- Reduce Library Use
- Combine Graphical Resources
- Choose Appropriate Image Types
- Remove Image Metadata, Remove unnecessary images.
- Resize Images
- Compress Images
- Delivering scaled image assets and Image optimization checklist
- Minify Your Code
- Script Location
- Enabling Caching
Inline small CSS
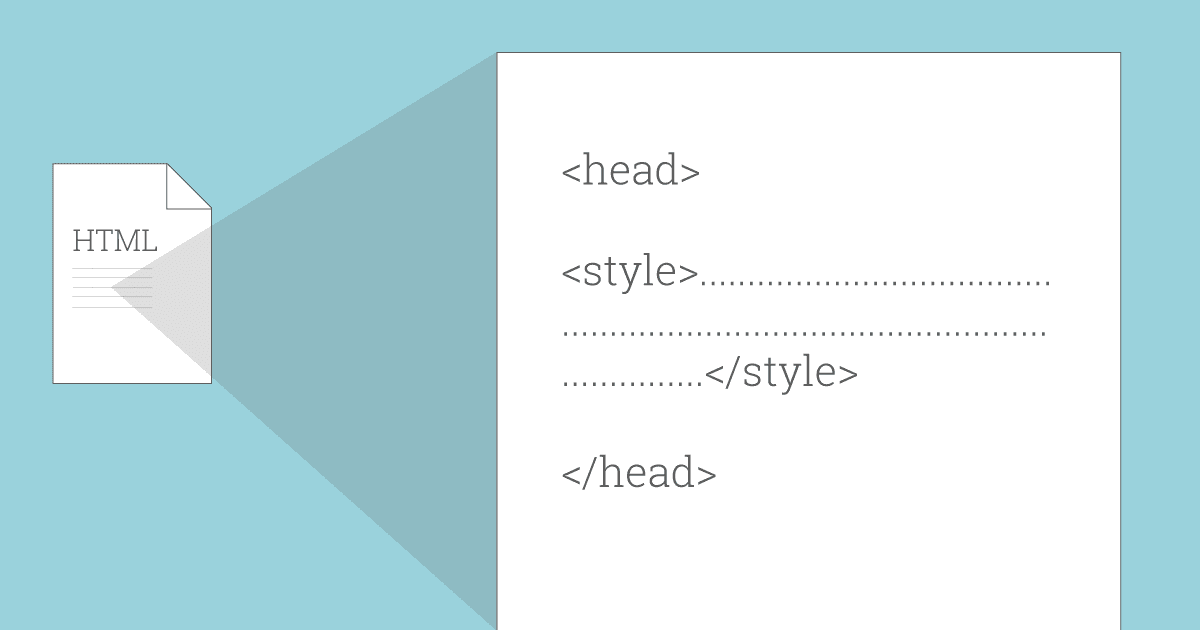
Do not use @import to call css
@import url(“style.css”)
@import from a CSS file should almost never be used, as it can prevent stylesheets from being downloaded concurrently. For instance, if stylesheet A contains the text.
then the download of the second stylesheet may not start until the first stylesheet has been downloaded.
Properly labeled conditional CSS
<link href=”other.css” rel=”stylesheet” media=”(min-width: 40em)”>
<link href=”print.css” rel=”stylesheet” media=”print”>
No inline element CSS
<h1 style=”font-size: 70px;”></h1>
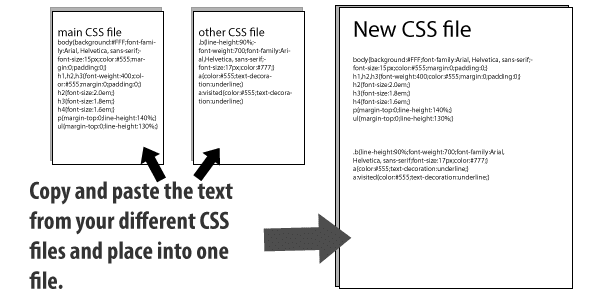
Combine files (CSS, JS) together.
Every CSS/JS files you use for your website adds to the number of HTTP requests your website requires, thereby adding time to your page load speed. While this is sometimes unavoidable, in most cases, you can actually combine two or more CSS/JS files together.
Reduce library use
Popular CSS and JavaScript libraries do their best to minify and compress their download files, but generally they’re still pretty serious bandwidth consumers. For example, a website might use jQuery’s handy toggleClass feature to flip classes in order to do something specific.
$(el).toggleClass(className);
if (el.classList) {
el.classList.toggle(className);
} else {
var classes = el.className.split(‘ ‘);
var existingIndex = classes.indexOf(className);
if (existingIndex >= 0)
classes.splice(existingIndex, 1);
else
classes.push(className);
el.className = classes.join(‘ ‘);
}
Combining graphical resource in CSS Sprites
It’s logical to combine multiple CSS or JavaScript resources into one file, but images? Actually, it is fairly simple, and it has the same effect of reducing the number of HTTP requests as combining text resources.
Although this technique can be applied to any group of images, it is most frequently used with small images such as icons, where extra HTTP requests to fetch multiple small graphics are particularly wasteful.

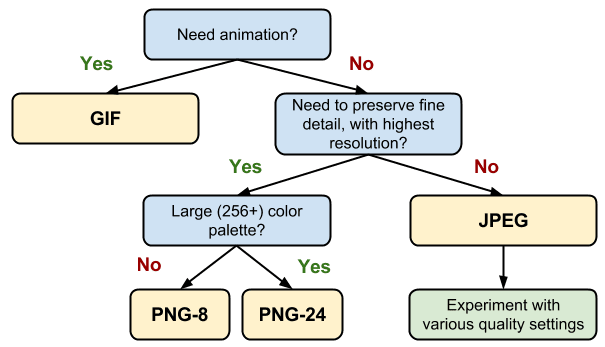
Choose Appropriate Image Types
As a rule of thumb, use PNGs for clip art, line drawings, or wherever you need transparency, JPGs for photographs, and GIFs when you need animation.
Remove metadata
Metadata, or “data about data”, exists in most images and may include (on a camera photo, for example) data about the camera/phone model, a date and time stamp, photo app settings, file format, height and width, geolocation coordinates, and more. An image editor might include metadata in its saved files such as author name, resolution, color space, copyright, and keywords.
For most website images, metadata is unimportant, so we would be wise to strip it out.
VerExif’s online tool is useful to remove the metadata.
Reduce the file size for the remaining images.
For the images you do keep, use high-quality photos that have a compressed file size. This will help reduce the time it takes to make a HTTP request, thereby reducing load time.
Remove unnecessary images.
First decide which files are taking longest to load, including image files. The easiest way to reduce the number of requested files?
Eliminate unnecessary images.
Images are a valuables webpages asset because they make for a strong visual experience on your webpages. However, if you have images on your page that aren’t contributing much value, it’s best to just cut them out altogether — especially the ones that are really large.
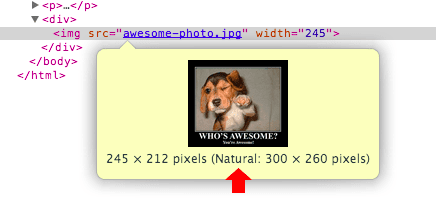
Resize Image
Size images based on their intended use
Large images take longer to download than smaller ones. All your images should be appropriately sized for their intended use and should not rely on the browser to resize them for rendering.
Reduce Image quality
we want our images to look as good as possible, within reason, so that means saving JPGs at 100% quality, right? Not necessarily. In most (which is to say nearly all) cases, you can reduce the JPG quality, and thus the file size, without suffering any visible quality difference.
Once you’ve determined the size that an image should really be, how do you get it to that size but still retain the quality and characteristics it needs? The first thing you need is a good image manipulation tool. For these modifications we used the popular Windows desktop product PAINT
Compress Image
PNG and JPG images can be squashed down even more using a compression tool, which reduces file size without affecting either image dimensions or visual quality. For example, here is an image compression done with TinyPng, a free online compression tool.
Delivering scaled image assets
- Delivering scaled assets is one of the simplest and most effective optimizations
- Pay close attention to large assets as they result in high overhead
- Reduce the number of unnecessary pixels by scaling your images to their display size
Minify your code
One simple and effective method is minification, which is essentially compressing a text resource by removing its whitespace and unnecessary characters without changing its validity or functionality. It doesn’t sound that useful, but it is. For example, this little function (part of a table-sorting script) initially contains 348 characters.
function sortables_init() {
// Find all tables with class sortable and make them sortable
if (!document.getElementsByTagName) return;
var tbls = document.getElementsByTagName(“table”);
for (ti=0;ti<tbls.length;ti++) {
thisTbl = tbls[ti];
if (((‘ ‘+thisTbl.className+’ ‘).indexOf(“sortable”) != -1) && (thisTbl.id)) {
ts_makeSortable(thisTbl);
}
}
}
function sortables_init(){if(!document.getElementsByTagName)return;var tbls=document.getElementsByTagName(“table”);for(ti=0;ti<tbls.length;ti++){thisTbl=tbls[ti];if(((”+thisTbl.className+”).indexOf(“sortable”)!=-1)&&(thisTbl.id)){ts_makeSortable(thisTbl)}}}
Enable caching
Caching works by categorizing certain page resources in terms of how frequently or infrequently they change. Your site’s logo image, for example, might almost never change, but your site’s scripts might change every few days. It’s beneficial to you and your users to determine which types of content are more static and which are more dynamic.
You can enable cache-control with a variety of options in a comma-delimited list. Here is an example of an Apache .htaccess configuration that sets caching for various image file types, as matched by an extension list, to one month and public access (some available options are discussed below).
<filesMatch “.(ico|jpg|jpeg|png|gif)$”>
Header set Cache-Control “max-age=2592000, public”
</filesMatch>
Script Location
Common convention is to put script blocks in the page head.
A simple and effective solution is to reposition the deferred script block at the end of the page. That is, put the script reference last, just before the closing body tag. This allows the browser to load and render the page content, and then lets it download the script while the user perceives the initial content. For example:
<html>
<head>
</head>
<body>
[Body content goes here.]
<script src=”mainscript.js”></script>
</body>
</html>
Combine CSS
Preconnect To Required Origins
Resource Hints
- Resource Hints is used for Predictive Caching.
- As Http caching is only used for the next request or Second request , Resource Hints tells the browser to point to the resource that is used for the same request or the next one.
- Types of Resource Hints :
- Preconnect
- Dns- prefetch
- Prefetch
- Preload
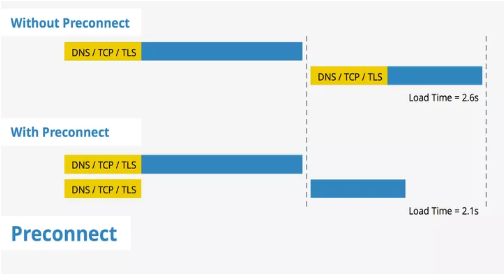
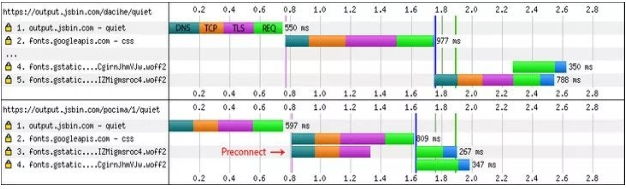
Preconnect :
- Preconnect allows the browser to setup early connections before an HTTP request is actually sent to the server.
- Preconnect :
- Resolve DNS
- Perform TCP handshake
- Setup TLS
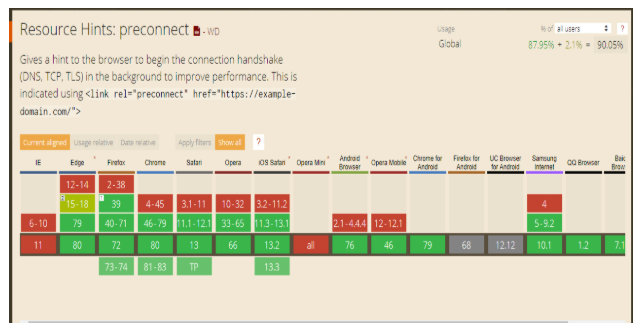
<link rel=”preconnect” href=”https://fonts.gstatic.com”>
Improve page load speed with preconnect
Browser support : Preconnect
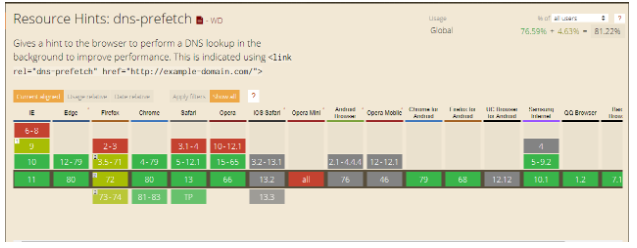
Dns-prefetch :
- Dns-prefetch is only effective for DNS lookup. It is useful for the resource which is loaded later.
- E.g. Autocomplete api for search list of website
<link rel=”dns-prefetch” href=”https://fonts.gstatic.com”>
<link rel=”dns-prefetch preconnect” href=”https://fonts.gstatic.com”>
Browser support : Dns-prefetch
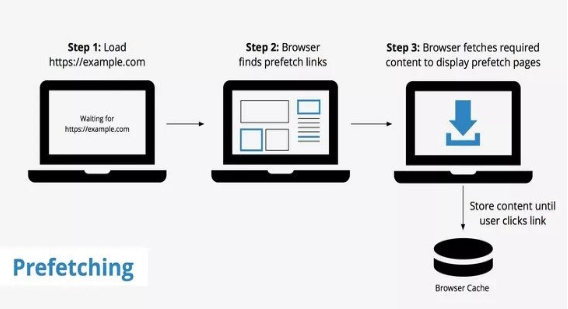
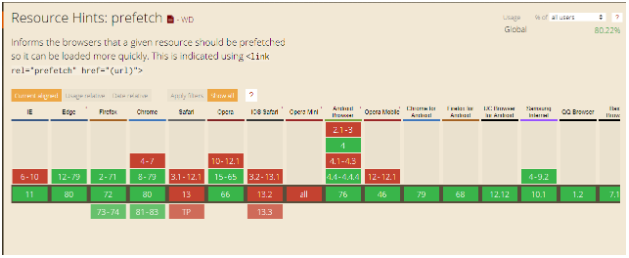
Prefetch :
- Prefetch download resources for later use that might be used for future navigations.
- Prefetch download the resources at low priority and store it in the cache until the next use.
- E.g. checkout related script
<link rel=”prefetch” href=”/checkout.js”>
Browser support : Prefetch
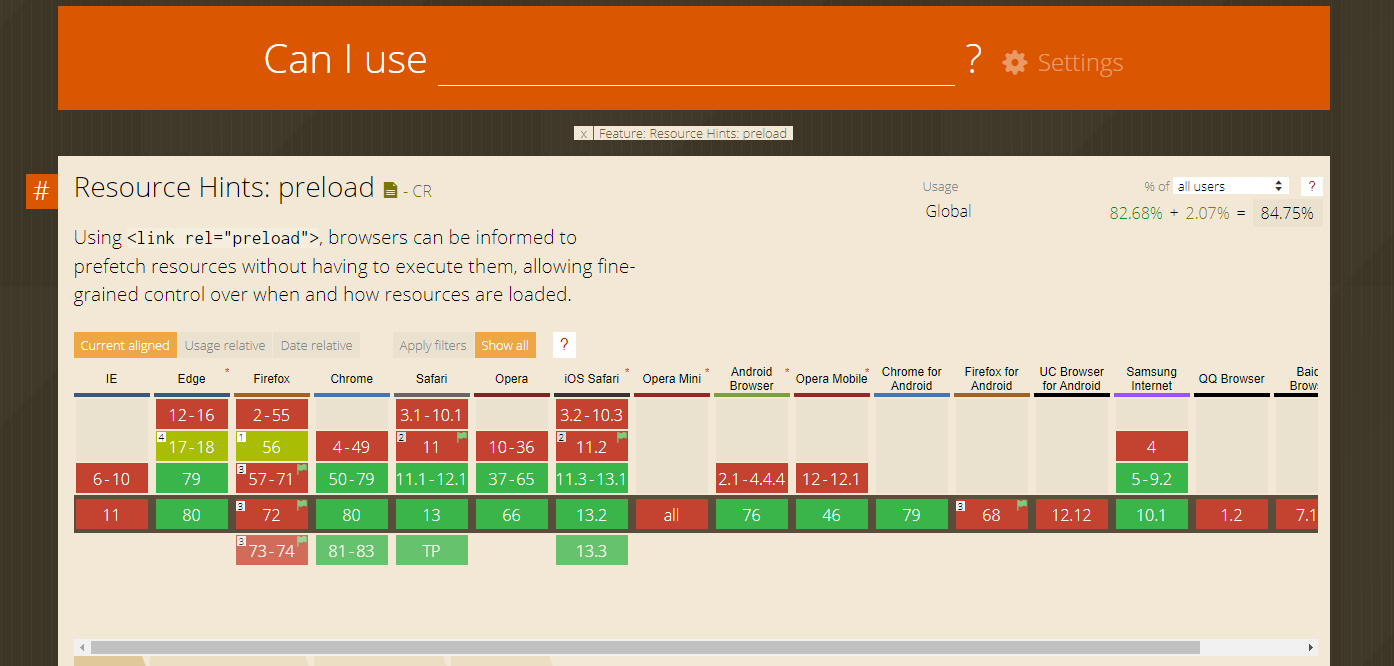
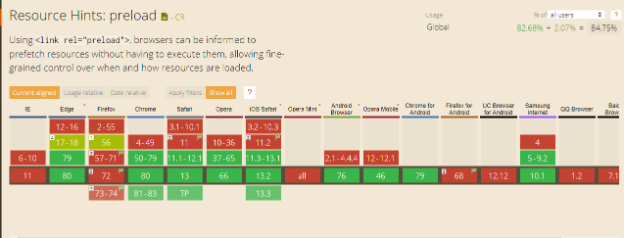
Preload :
- Preload download late-discovered resources needed for current navigation.
<link rel=”preload” href=”used-later.js” as=”script”> - The as attribute, give the browser more context about the destination of preloading request being made.
- It ensures that the browser will set appropriate request headers, request priority, as well as apply any relevant Content Security Policy directives that might be in place for the correct resource context.
Browser support : Preload
Enable Text Compression
Text compression minimises the byte size of network responses that include text content. Less bytes downloaded means faster page loads.
When a browser requests a resource, it lists what text compression encodings it supports in the accept-encoding request header. The server encodes the response in one of the formats that the browser supports and indicates which format it used in the content-encoding response header.
Compression Formats:
- Brotli (Short name: br – A newer compression format)
- Gzip (Universally support by all modern browser)
- Deflate
How to enable text compression on your server?
Brotli configuration:
https://www.tunetheweb.com/performance/brotli/
https://wiki.centos-webpanel.com/enabling-brotli-compression-on-apache
Config to .htaccess to enable Brotli compression:
<IfModule mod_brotli.c>
AddOutputFilterByType BROTLI_COMPRESS text/html text/plain text/xml text/css text/javascript application/x-javascript application/javascript application/json application/x-font-ttf application/vnd.ms-fontobject image/x-icon
</IfModule>
Check response on Chrome DevTools:
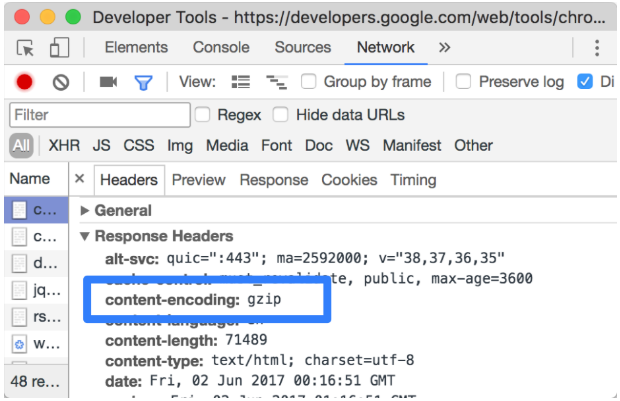
Ref: https://developers.google.com/web/tools/lighthouse/audits/text-compression
Can I Use: https://caniuse.com/#search=Gzip
Brotli: https://opensource.googleblog.com/2015/09/introducing-brotli-new-compression.html
Specify a character set early
Setting the character set at the server level reduces browser processing.
What is character set?: A character set is essentially a set of characters represented by numbers for a computer. For example in the ASCII character set the numbers 0-127 are used to represent all English characters as well as special control characters.
Why Important?: It’s important to specify a character set in the HTTP response headers of your HTML documents to allow the browser to begin parsing HTML and executing scripts immediately.
Without specifying a character set the browser is left to figure it out on its own which takes time and therefore negatively impacts your page load times.
Why should you avoid setting it in the meta http-equiv tag?:
Setting the character set in the meta http-equiv tag disables the lookahead downloader in Internet Explorer 8. Disabling the lookahead downloader can substantially increase the amount of time it takes to load your page.
How to do it?: Avoid using meta tags you must set the Character Set from the Server. This is the most efficient method to set the character set, because you don’t need to set it for every page. Set your server to send a Content-Type header for all documents it serves that are of type text/html.
For example:
Content-Type: text/html; charset=UTF-8
Charset is where you set your character type.
Avoid a character set in the meta tag
Specifying a character set in a meta tag disables the lookahead downloader in IE8. To improve resource download parallelization, move the character set to the HTTP Content-Type response header.
Specify a Vary: Accept-Encoding header
Gtmetrix: Bugs in some public proxies may lead to compressed versions of your resources being served to users that don’t support compression. Specifying the Vary: Accept-Encoding header instructs the proxy to store both a compressed and uncompressed version of the resource.
Other Source: Accept-encoding header is an HTTP header which must be included on every origin server response. Its main job is to inform the browsers if the client can handle the compressed version of the website.
The warning can appear when you don’t use the Vary: Accept-Encoding in your header on a server or CDN. This will cause either of them to deliver the uncompressed version of your website to modern browsers.
It will affect the website performance.
https://www.hostinger.in/tutorials/specify-vary-accept-encoding-header
Fixing “Specify a Vary: Accept-Encoding Header”
NGINX server: SSH access needed
/etc/nginx/nginx.conf => Find “gzip_vary” and change to “gzip_vary on”
Apache server: FTP client access needed
.htaccess file and add below code
<IfModule mod_headers.c>
<FilesMatch “.(js|css|xml|gz|html)$”>
Header append Vary: Accept-Encoding
</FilesMatch>
Chaining Critical Requests
Avoid chaining critical requests
- The Critical Request Chain is a concept from the Critical Rendering Path (CRP) optimisation strategy. CRP enables the browser to load a page as quickly as possible by prioritising which resources get loaded and the order in which they load.
- The greater the length of the chains and the larger the download sizes, the more significant the impact on page load performance.
- Optimising for performance is all about understanding what happens in these intermediate steps between receiving the HTML, CSS, and JavaScript bytes and the required processing to turn them into rendered pixels – that’s the critical rendering path.
Ref: https://developers.google.com/web/fundamentals/performance/critical-rendering-path/
Please check the diagram below which shows the lighthouse report and chain requests.
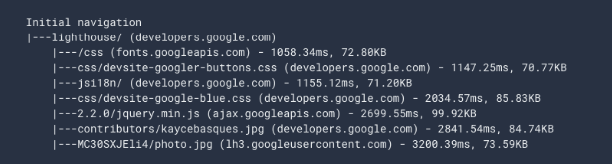
The path from lighthouse/ to /css is one chain. The path from lighthouse/ to css/devsite-googler-buttons.css is another chain. And so on.
The diagram above would have a “score” of seven number of chain.
How to reduce the effect of critical request chains on performance
- Minimising the number of critical resources: eliminating them, deferring their download, marking them as async, and so on.
- Optimising the number of critical bytes to reduce the download time (number of roundtrips).
- Deferring the download of unnecessary resources
Prefer asynchronous resources
- When a browser parses a traditional script tag, it must wait for the script to download, parse, and execute before rendering any HTML that comes after it. With an asynchronous script, however, the browser can continue parsing and rendering HTML that comes after the async script, without waiting for that script to complete. When a script is loaded asynchronously, it is fetched as soon as possible, but its execution is deferred until the browser’s UI thread is not busy doing something else, such as rendering the web page.
- Using async and defer attributes.
Reduce the Impact of Third-Party
What is Third Party Code
- Third-party scripts: ads, analytics, trackers, social-media buttons, and so on. (Youtube, Social Sharing, Advertisement, etc.)
- Third-party scripts provide a wide range of useful functionality, making the web more dynamic, interactive, and interconnected.
How do you load third-party scripts efficiently?
- Load the script using the async or defer attribute to avoid blocking document parsing.
- Consider self-hosting the script if the third-party server is slow.
- Lazy-load Third Party Resources (First Interaction on load.)
- HTTPS is a must. Sites working over HTTPS shouldn’t have third-parties working over HTTP.
Conclusion
- Only use those Third Party links which are fast and support async loading patterns.
- Better to use it locally rather than from a third party.
- Use custom code for social sharing (Not Plugins).
- Use CDN
GTM – This allows you to manage all of your scripts and tags in one place.
Avoid enormous network payloads
Total size & time require to load different resources create a network payload.
- Reducing the total size of network requests
- Speeds up page load time
- Saves your users money that they would have spent on cellular data.
- Strategies for reducing payload size:
- Defer requests until they’re needed. See The PRPL (Push, Render, Pre-cash, Lazy load) Pattern for one possible approach.
- Optimize requests to be as small as possible. Possible techniques include
- Enable text compression.
- Minify HTML, JS, and CSS
- Use WebP instead of JPEG or PNG.
- Set the compression level of JPEG images to 85
- Cache requests so that the page doesn’t re-download the resources on repeat visits.
The 0 to 100 score is calculated from a lognormal distribution.
Enable Text Compression in IIS
- Static Compression
- Compressed static content in the path that is specified by the directory attribute, which increases compression performance by eliminating the need to re-compress content that has already been compressed. After IIS 7 has compressed a file, subsequent requests are given the compressed copy of the file from the cache directory.
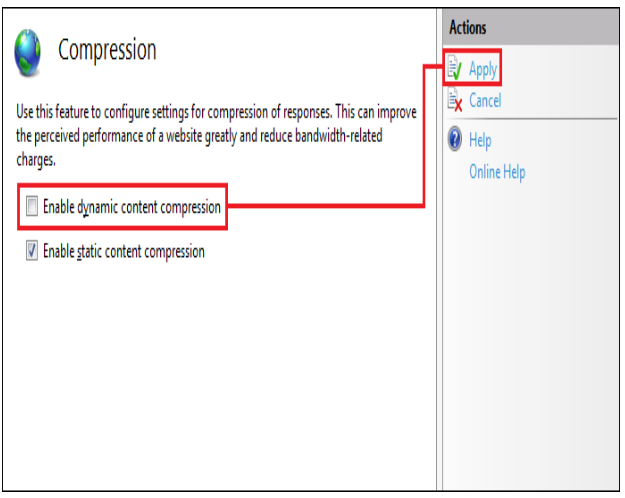
- Dynamic Compression
- Unlike static compression, IIS 7 performs dynamic compression each time a client requests the content, but the compressed version is not cached to disk.
How to Install & Configure?
- While installing IIS features, there are options to install static and dynamic features.
- Once installed you can check/ uncheck & set it from IIS.
- By default, it’s on for each website if it’s installed.

CDN caching
When CDN is used after site is up & running and you have to reflect the change instantly.
- CDN like Cloudflare provide 2 options:
- Purge All
- Purge all immediately clears all resources from your CDN cache in all Cloudflare data centers. Each new request for a purged resource returns to your origin server(s) to validate the resource.
- Use it wisely and when necessary.
- Purge by single-file (by URL)
- When you choose the Purge by URL (single-file) option in the Caching app, that cached resource is immediately removed from the stored assets in your Content Delivery Network (CDN) across all data centers. Any new request for the purged asset gets the latest version from your origin web server and adds it back to your CDN cache within the specific Cloudflare data center that served the request.
- For e.g. http://xyz.com/css/style.css
- Steps:
- Login into cloudflare
- Go to caching
- In the Purge Cache select Custom Purge.
- In custom purge dialog box select URL in purge by field.
- Add URL(s) to purge.
- Click purge.
- Purge All
Note: You can automate or script cache purges using APIs. E.g. https://api.cloudflare.com/#zone-purge-all-files
Add Expire Headers
What is it?
- Expires Headers tell the web browser how long to store a file in the cache.
- Keeping the files in the cache of your computer means on future visits to that page the browser will not need to download the file again.
How does it work?
- Expires headers can be set on file types or specific files.
- When the browser comes to the website it can see when was the last time it downloaded the specific file types. If it was recently it will display them from the cache, if you haven’t visited the site in a while it will download the newest version from the web server. If a file is missing from the cache it will be downloaded from the server.
How to decide?
- For items that change rarely on your site, like your logo or favicon, you can set the images to expire later.
- For items that tend to change more often, you can shorten the time. Again you can do this on a per file or file type basis.
Syntax will vary over each framework & technology pattern. Even in .NET to add expire header in traditional ASPX Webforms, MVC & .NET Core can vary. E.g. Where to specify & syntax.
You can set the expiry times in minutes, hours, day, months & years.
- The expiry time to set depends on 2 things:
- Resource Type
- CSS
- JS
- Images
- Change Frequency
- CSS, JS files are less likely to change after development.
- On the other hand images may change and mostly managed from the back-end. I.e. product images
- Resource Type
- Therefore, we can set different time for each resource type.
- For e.g. CSS ~ 1 month, JS ~ 1 month, Images ~ 7 days etc.
- Note: Expires Headers don’t improve page speed for a first visit, after all you need to have downloaded the files at least once to reference them again. But for return visitors, page load times will be faster.
Add Expire Headers – .NET
In the startup.cs file, under Configure() method we need to add below code.
Example:
public void Configure(IApplicationBuilder app, IWebHostEnvironment env)
{
app.UseStaticFiles(new StaticFileOptions
{
OnPrepareResponse = ctx => {
ctx.Context.Response.Headers.Append(“Expires”, DateTime.UtcNow.AddDays(7).ToString(“R”, CultureInfo.InvariantCulture));
}
}
}
In traditional .NET settings can be specified in web.config.
Add Expire Headers – PHP
In .htaccess file
## EXPIRES CACHING ##
<IfModule mod_expires.c>
ExpiresActive On
ExpiresByType image/jpg “access plus 1 month”
ExpiresByType image/jpeg “access plus 1 month”
ExpiresByType image/gif “access plus 1 month”
ExpiresByType image/png “access plus 1 month”
ExpiresByType text/css “access plus 1 month”
ExpiresByType application/pdf “access plus 1 month”
ExpiresByType text/x-javascript “access plus 1 month”
ExpiresByType application/x-shockwave-flash “access plus 1 month”
ExpiresByType image/x-icon “access plus 1 year”
ExpiresDefault “access plus 2 days”
</IfModule>
## EXPIRES CACHING ##
Reference Link: https://gist.github.com/boogah/1842173
Configure entity tags (ETags)
What are Entity Tags?
- Entity tags, also commonly referred to as ETags, are a mechanism web servers and the browser use to determine whether a component in the browser’s cache matches one on the origin server.
- This mechanism helps improve loading times since if the resource can be retrieved from local cache, the browser does not need to make an additional request to the server.
- A traditional ETag is comprised of three separate components which make it an unique identifier for each resource:
- INode
- An inode is a data structure used by the Linux file system. Every file and directory has an inode which stores its name, size and other data. Every inode has a number which uniquely identifies it.
- The ETag is an identifier which should uniquely identify a file on the webserver, and the inode number is a number which uniquely identifies a file on the filesystem, so it seemed to make sense to use one for the other.
- MTime (Modified Date Time)
- Size
- INode
- An example of what an ETag may resemble containing all three components would be similar to 13630e1-b438-524daace96280. However, this may change in structure depending upon the web server.
Problems with ETags
- Although entity tags can be useful for minimizing the amount of round trips (thanks to caching), there does exist a problem in using this method.
- ETags are meant to be used on a website which only delivers content from a single server.
- Therefore, for websites that are delivering various resources from multiple servers using either Apache or IIS, entity tags do not work well. E.g. Load balancing/ Web Farm server
How does this work and why won’t it work for multiple server directly?
- Example
- ETags generated for the same components across various servers will not be recognized from one server to another and therefore will return a status code 200 instead of 304 Not Modified.
- Real Life Example
That doesn’t mean it can’t be fixed for multiple server scenarios. Let’s see how?
How to Configure Entity Tags (ETags)
- For those using Apache 2.4 or higher, there is no configuration required as Apache has updated the FileETag directive.
- However, to configure entity tags (ETags) for websites running on older versions of Apache, the INode portion of the ETag can be stripped by modifying the snippet within your httpd.conf file from
- FileETag INode MTime Size
to - FileETag MTime Size
- FileETag INode MTime Size
- This will remove the first section of the ETag and will leave you with something similar to b438-524daace96280. Now that there is no server component within the ETag, this fixes the multiple server issue
- Old: 13630e1-b438-524daace96280
- New: b438-524daace96280
Remove ETags Entirely
- Website owners who are using multiple servers to deliver content can decide whether they want to specify a cache validator using ETag or Last Modified. As long as you are using a web server which solves the ETag INode issue, or have properly configured it yourself, both options are valid.
- However, if you choose to use Last-Modified header, which validates the component based on a timestamp, you can simply remove ETags and use Last-Modified in conjunction with Expires or Cache-Control.
- In Apache, removing ETags is done by adding the following to your configuration file.
Header unset ETag
FileETag none
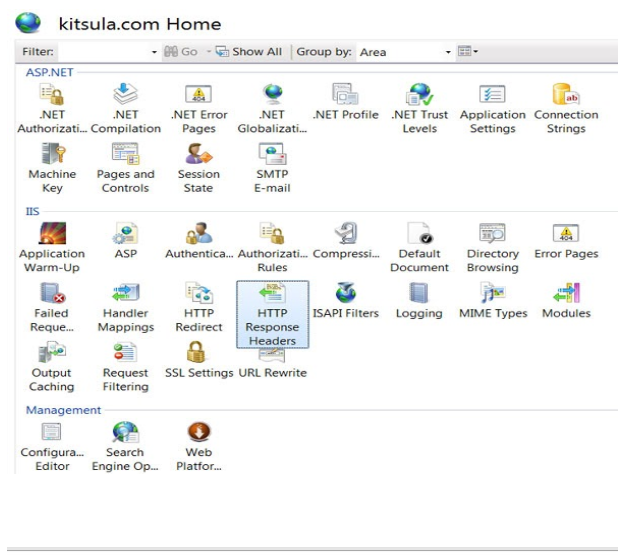
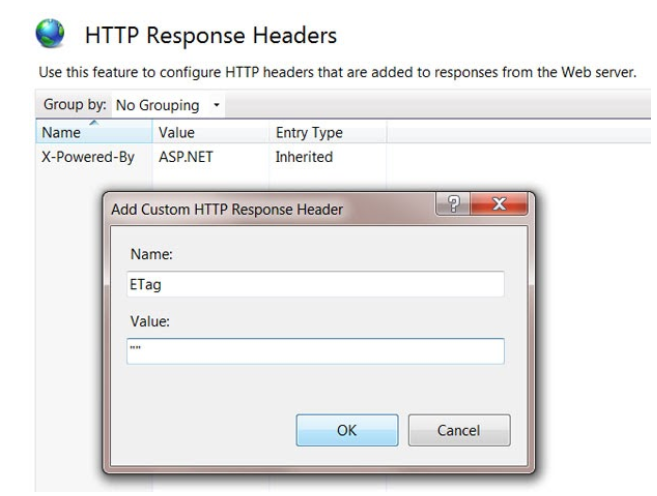
Configure entity tags (ETags) in IIS
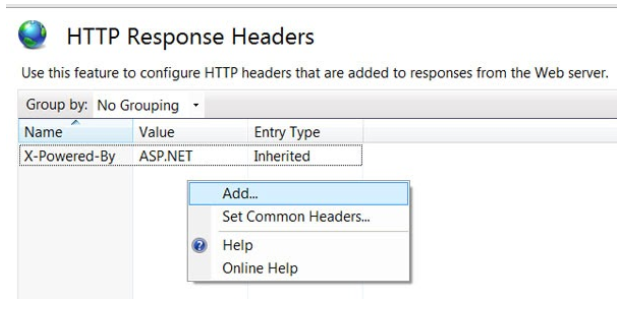
- Go to IIS, select website and click on HTTP Response Headers.
- In the dialog box, Add ETag in Name textbox and in value add empty double quotes.
Configure entity tags (ETags) in Web.config
<system.webServer>
<httpProtocol>
<customHeaders>
<add name=”ETag” value=”""” />
</customHeaders>
</httpProtocol>
</system.webServer>
Now every object from web server will have at least one ETag